Congratulations on taking the first step towards creating your own online voice! This guide will walk you through the simple process of setting up a free WordPress blog. From purchasing a domain and hosting to crafting your first blog post, we’ll provide you with clear instructions and helpful resources.
Here’s what you can expect:
- Setting Up the Foundation: We’ll cover acquiring a domain name and hosting, essential building blocks for your blog.
- Installing WordPress: Learn about the straightforward installation process and discover resources for a more in-depth guide.
- Picking Your Perfect Theme: Explore the importance of choosing a high-quality theme and get introduced to Phlox, a user-friendly and versatile option.
- Customizing Your Blog: We’ll delve into installing Phlox and demonstrate the easy process of importing a pre-designed demo to get you started quickly.
- Creating Your First Post: Unleash your creativity by writing and publishing your inaugural blog post.
- Building Trust: Learn how to create “About Me,” “Contact Me,” and “Privacy Policy” pages to establish credibility with your readers.
- Expanding Your Capabilities: Discover the power of plugins and explore how to install Depicter, a valuable tool for adding visual elements to your blog.
Purchase Domain and Hosting
Before you can launch your WordPress blog, you’ll need two essential components: a domain and hosting. A domain is your website’s unique address on the Internet. For example, “example.com” is a domain.
GoDaddy: One of the largest domain registrars, GoDaddy offers a wide range of domain extensions and additional services.
Hosting is like renting digital space where your website’s files live. It’s the server that makes your site accessible to visitors.
When choosing a host, consider factors like reliability, speed, and customer support. Look for providers offering features such as automatic backups, security measures, and scalability. For your domain, opt for a name that’s memorable, relevant to your blog’s topic, and available in your preferred extension (like .com, .net, or .org). Avoid overly complex or generic names.
Install WordPress
Setting up a WordPress blog is a straightforward process that doesn’t require any technical expertise. With a few simple steps, you can have your own online space up and running in no time.
To learn more about the detailed installation process, refer to our comprehensive guide:
This guide will walk you through each step, providing clear instructions and visual aids to ensure a smooth installation experience.
InstaWP Live Service for Hosting WordPress
If you’re looking for a simplified way to host your WordPress blog, InstaWP Live is an excellent option. This managed WordPress hosting service takes care of all the technical aspects, allowing you to focus on creating and managing your content. With InstaWP Live, you can enjoy fast performance, enhanced security, and easy scalability for your growing blog.
Selecting Your WordPress Theme
Selecting a high-quality WordPress theme is pivotal for the success of your blog. A well-crafted theme not only enhances your blog’s visual appeal but also significantly impacts its functionality and performance. By choosing a theme optimized for speed, SEO, and user experience, you create a solid foundation for your online presence. A battle-tested theme often includes advanced features, dedicated support, and regular updates, ensuring your blog remains secure, efficient, and adaptable to evolving trends. Ultimately, a top-quality theme contributes to a professional image, improved reader engagement, and better search engine visibility.

Phlox is an exceptional choice for crafting a dynamic and engaging WordPress blog. Its sleek design, coupled with a collection of customization options, empowers bloggers to create visually stunning websites without the need for coding expertise. With a focus on speed, SEO, and responsiveness, Phlox ensures your content reaches a wider audience. The theme’s versatile layout options, from classic to modern, cater to diverse blogging styles. Moreover, its seamless integration with popular page builders like Elementor and Visual Composer opens up endless possibilities for creative expression.
Top Features for Blogging with Phlox
- Diverse Blog Layouts: Choose from a variety of layouts to suit your blogging style, including classic, grid, masonry, and more.
- Customizable Blog Posts: Tailor each post with featured images, excerpts, and multiple post formats.
- Fast Loading Speeds: Enhance user experience and improve SEO with optimized performance.
- SEO-Friendly Structure: Improve search engine visibility with built-in SEO features.
- Responsive Design: Ensure your blog looks great on all devices.
- Integration with Popular Page Builders: Create stunning blog posts with Elementor or Visual Composer.
- One-Click Demo Import: Quickly set up your blog with pre-designed templates.
- Master Slider Pro Included: Showcase featured posts in captivating slideshows.
- Regular Updates: Benefit from ongoing improvements and security enhancements.
- Excellent Customer Support: Receive assistance and troubleshooting when needed.
Responsive is another perfect all-in-one solution for anyone looking to build a beautiful, high-performing website without breaking the bank. No coding experience is required! Its user-friendly drag-and-drop interface empowers you to personalize your website with ease. Simply drag and drop elements to arrange your layout, customize colors and fonts, and craft a website that reflects your unique vision.
This WordPress theme is built with speed in mind, ensuring your website loads lightning-fast and delivers a seamless user experience for your visitors.
Responsive adapts to any device, thanks to its responsive layout design. Your website will look stunning and function flawlessly on desktops, tablets, and smartphones, guaranteeing a consistent and engaging experience for all your visitors.
Top Features of Responsive Theme
- Effortless Design
- Drag-and-Drop Editing
- Blazing Speed
- SEO Friendly
- Mobile-Ready
- Compatibility
- Quick Launch
Installing Phlox
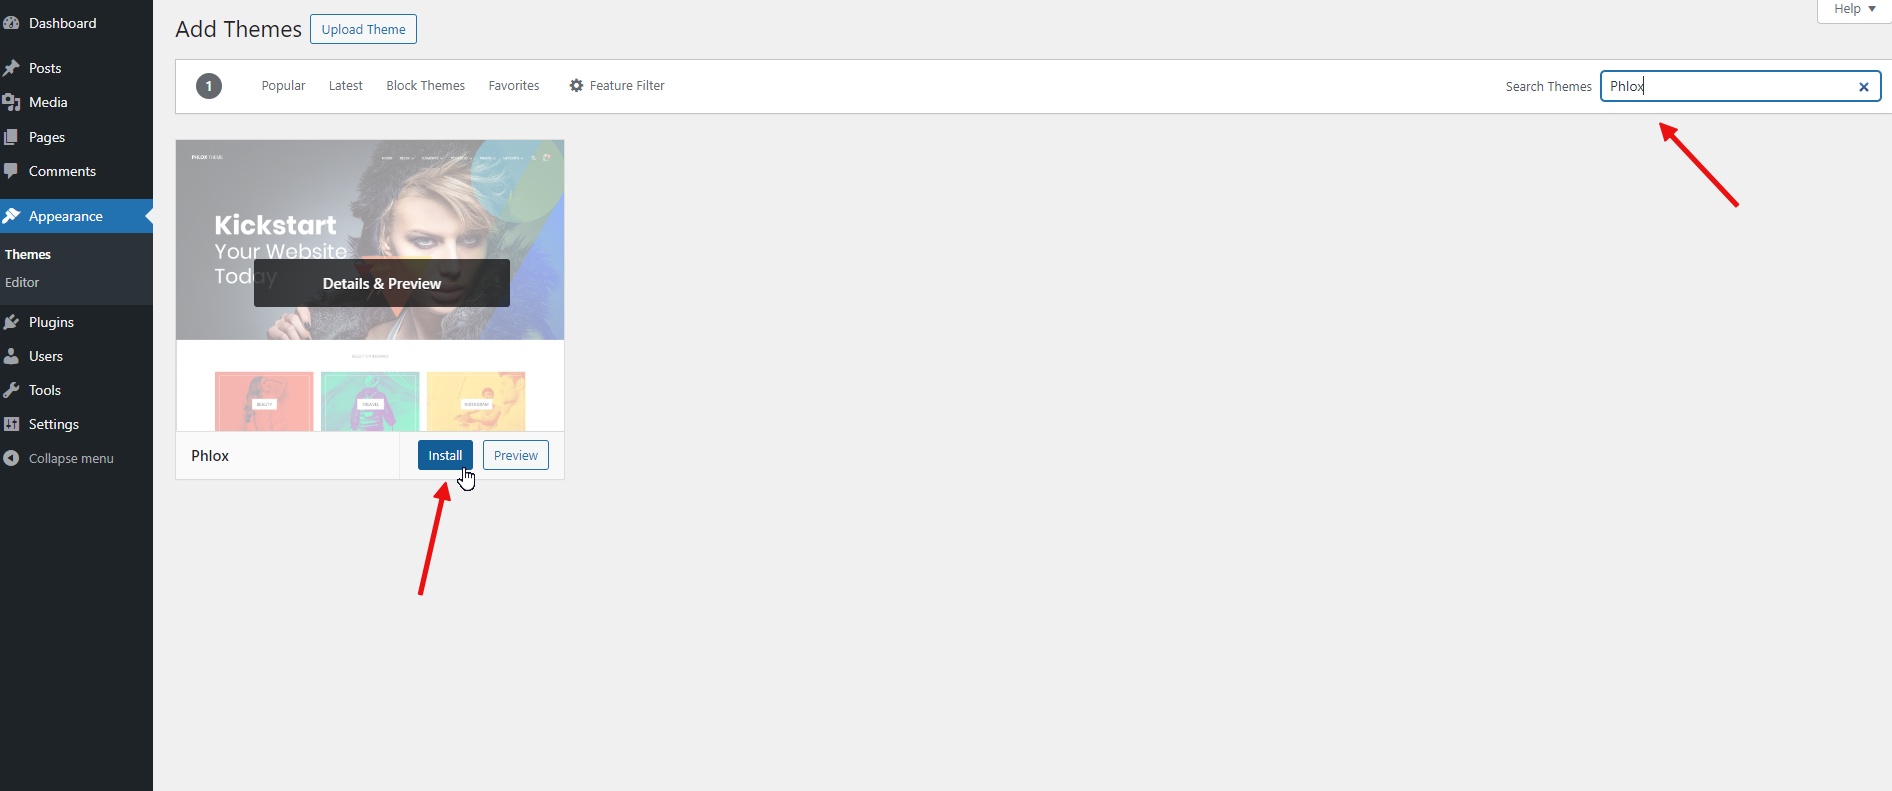
To install Phlox, click on the “Add new theme” option in the Themes menu, then search for “Phlox” and it will appear in the results. After that, click on the “Install” and then “Activate” buttons.
Import a blog demo
After installing and activating Phlox, you will be automatically redirected to its dedicated dashboard. The next step is to import a ready-made demo. To do this, simply go to the “demo importer” menu in the dedicated Phlox dashboard.
Here, you will find a large number of free and Pro demos available for use.
You can look for blog demos under the “Blog & Magazine” filter at the top of the demo list.
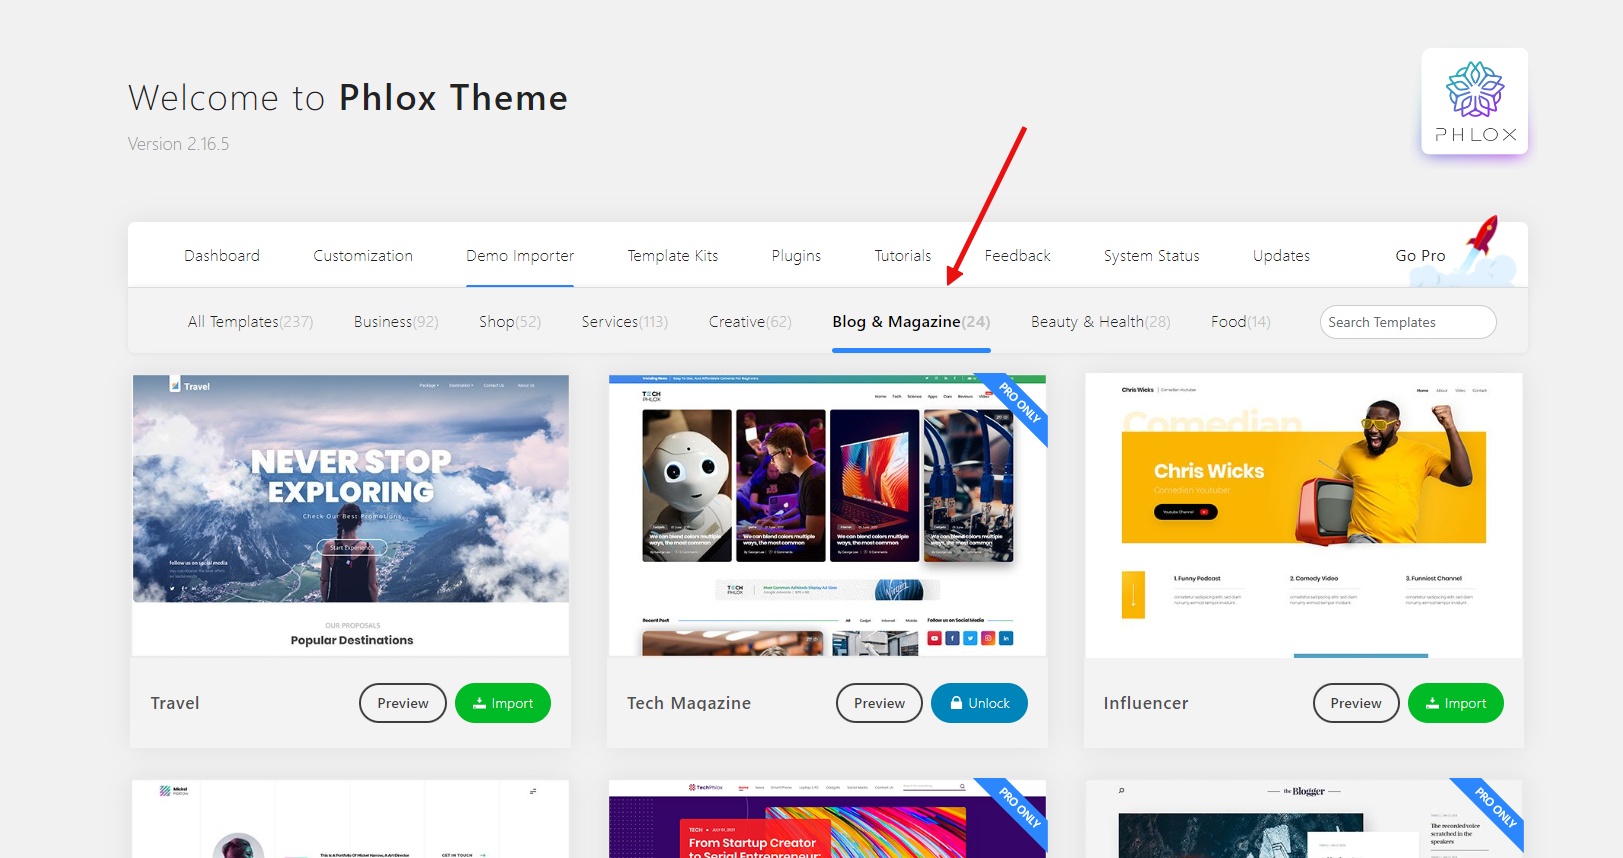
Let’s import the Food Blog demo. Hover your mouse on the demo name and click the “Import button”.
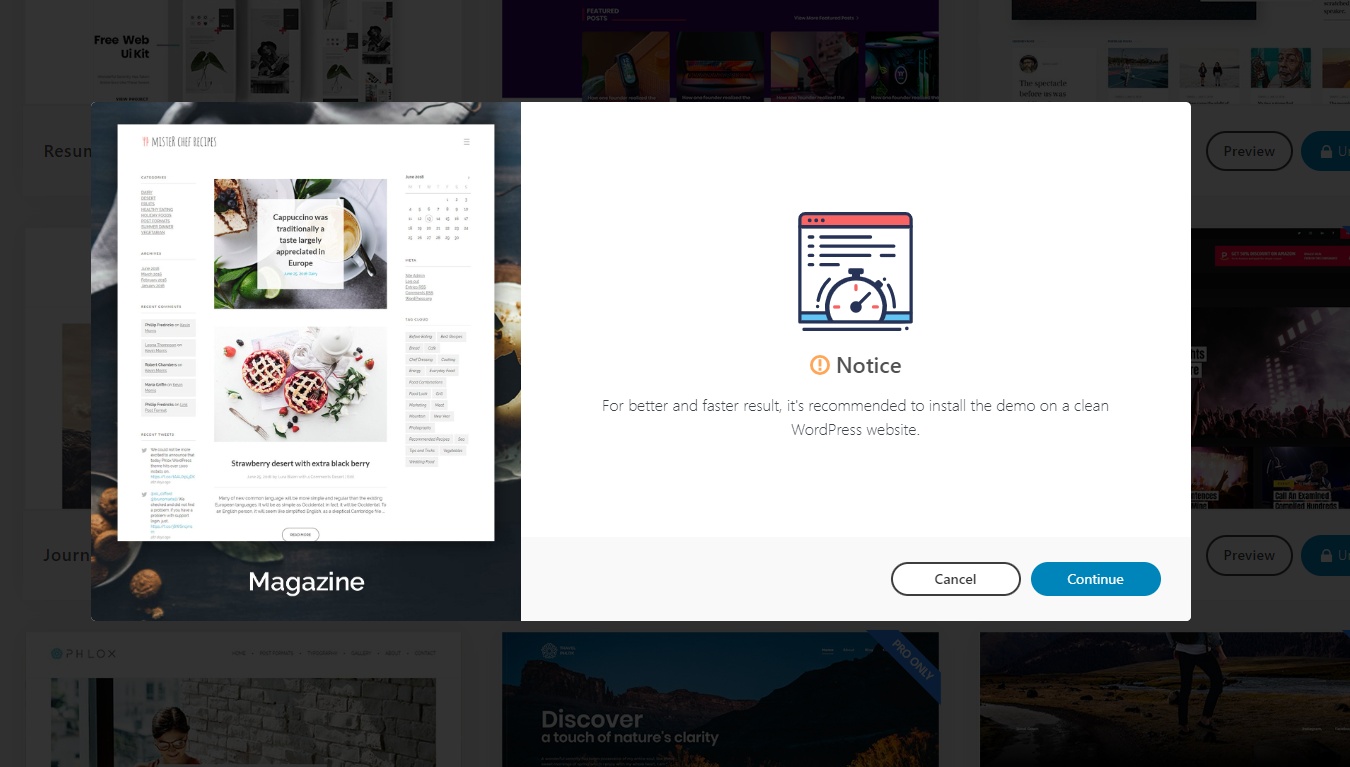
After clicking the “Import” button, the process of importing the demo content begins.
Step 1: Continue. Click the “Continue” button to proceed to the next step.
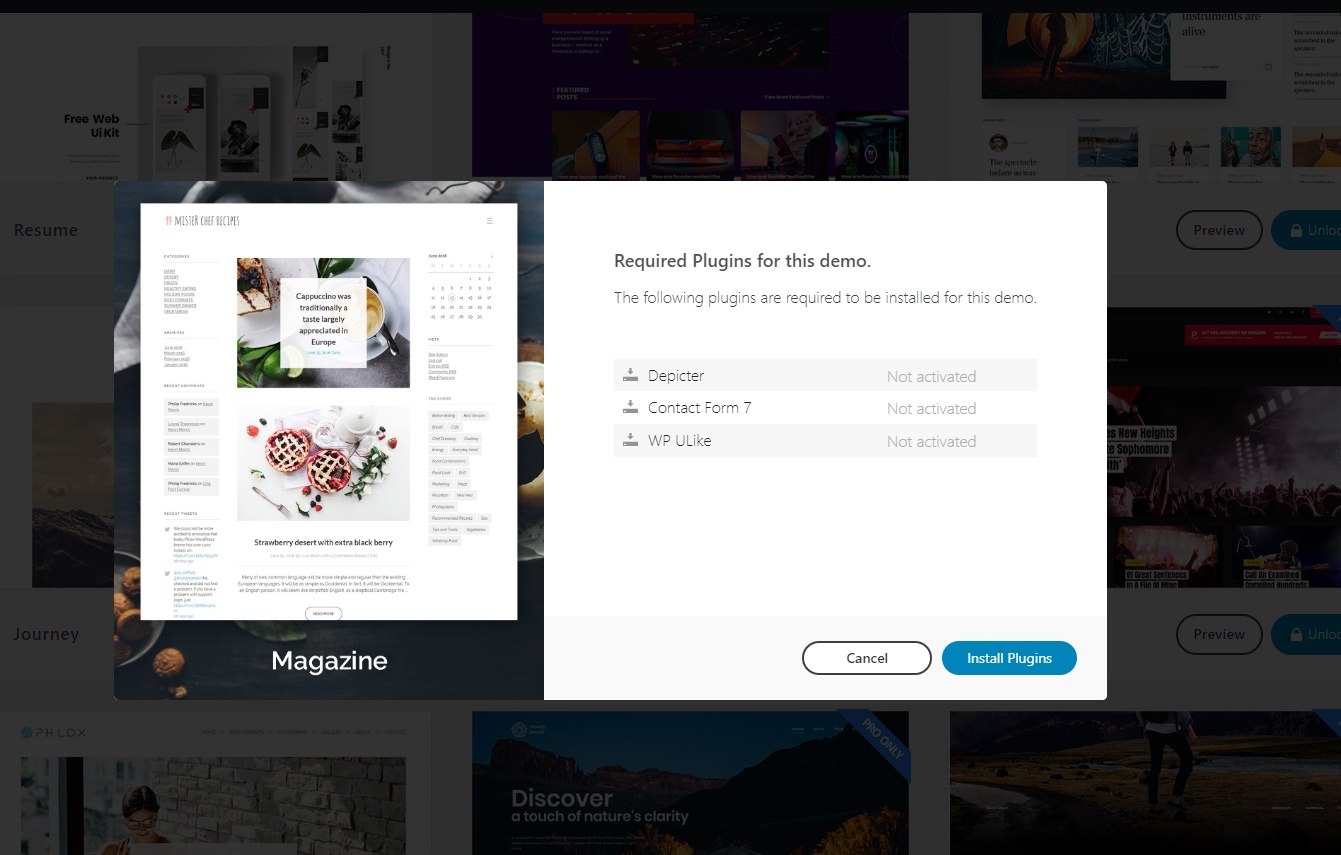
Step 2: Install the required plugins. A list of plugins essential for importing this specific demo will be displayed. Click the “Install plugins” button to install these necessary plugins automatically. These additional plugins will enhance the functionality of your website.
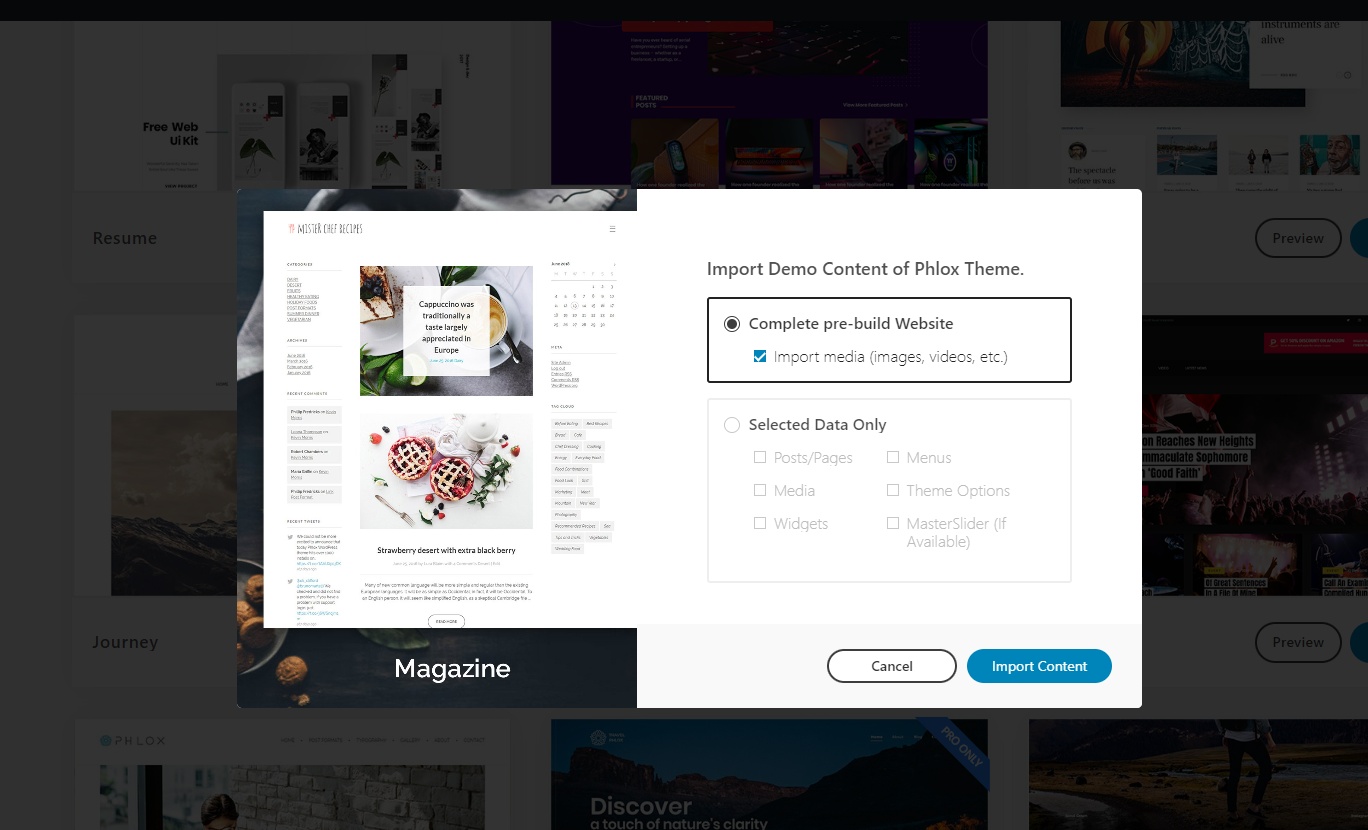
Step 3: Import Content. Select the first option, to import all the content from the demo, including pages, posts, images, and other elements. Then, click the “Import content” button to initiate the import process.
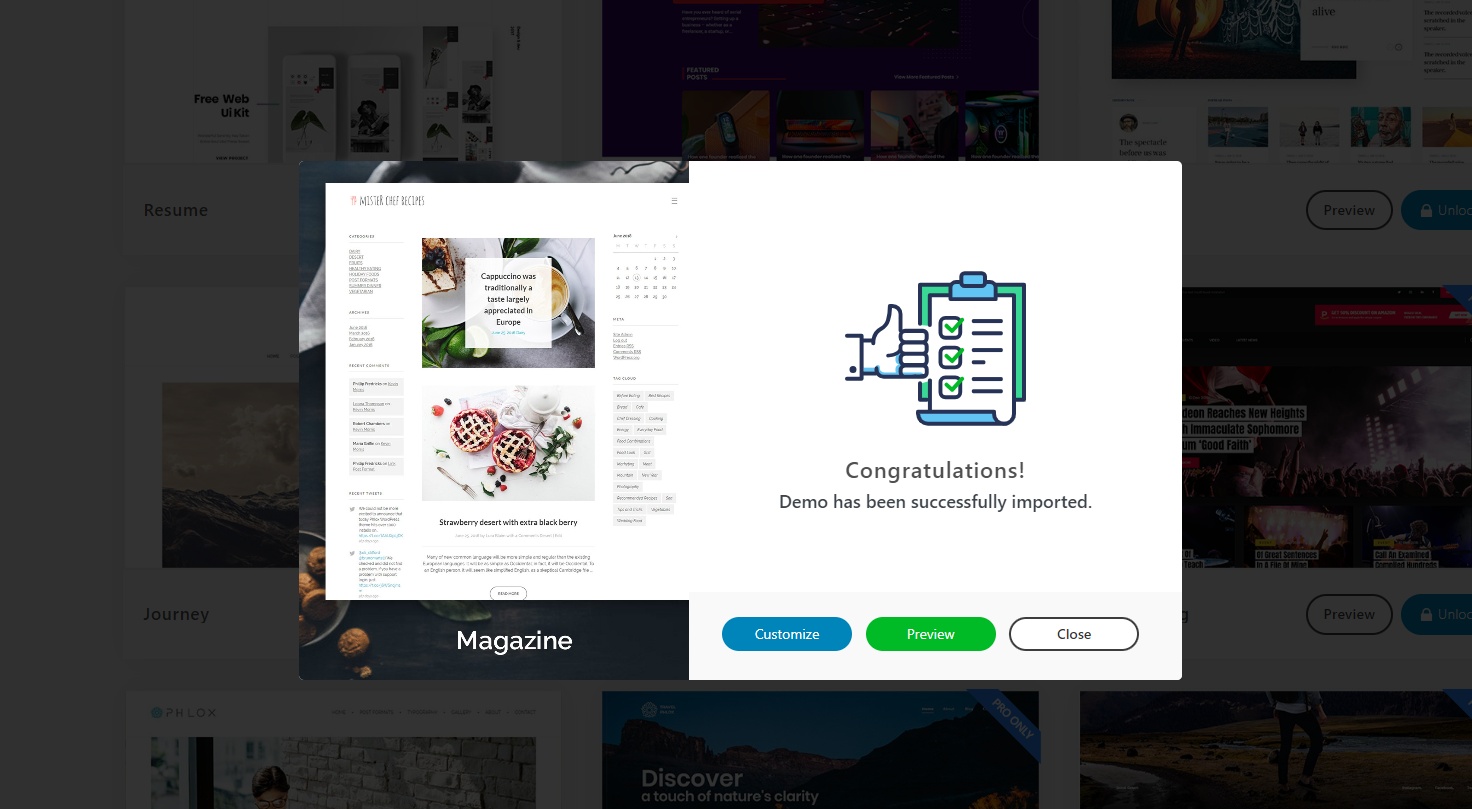
Wait for Completion. The import process will start, and it may take a few minutes to complete. During this time, please be patient as the system transfers all the demo data to your website.
Once the import is finished, the demo content will be fully integrated into your website, providing you with a ready-to-customize starting point.
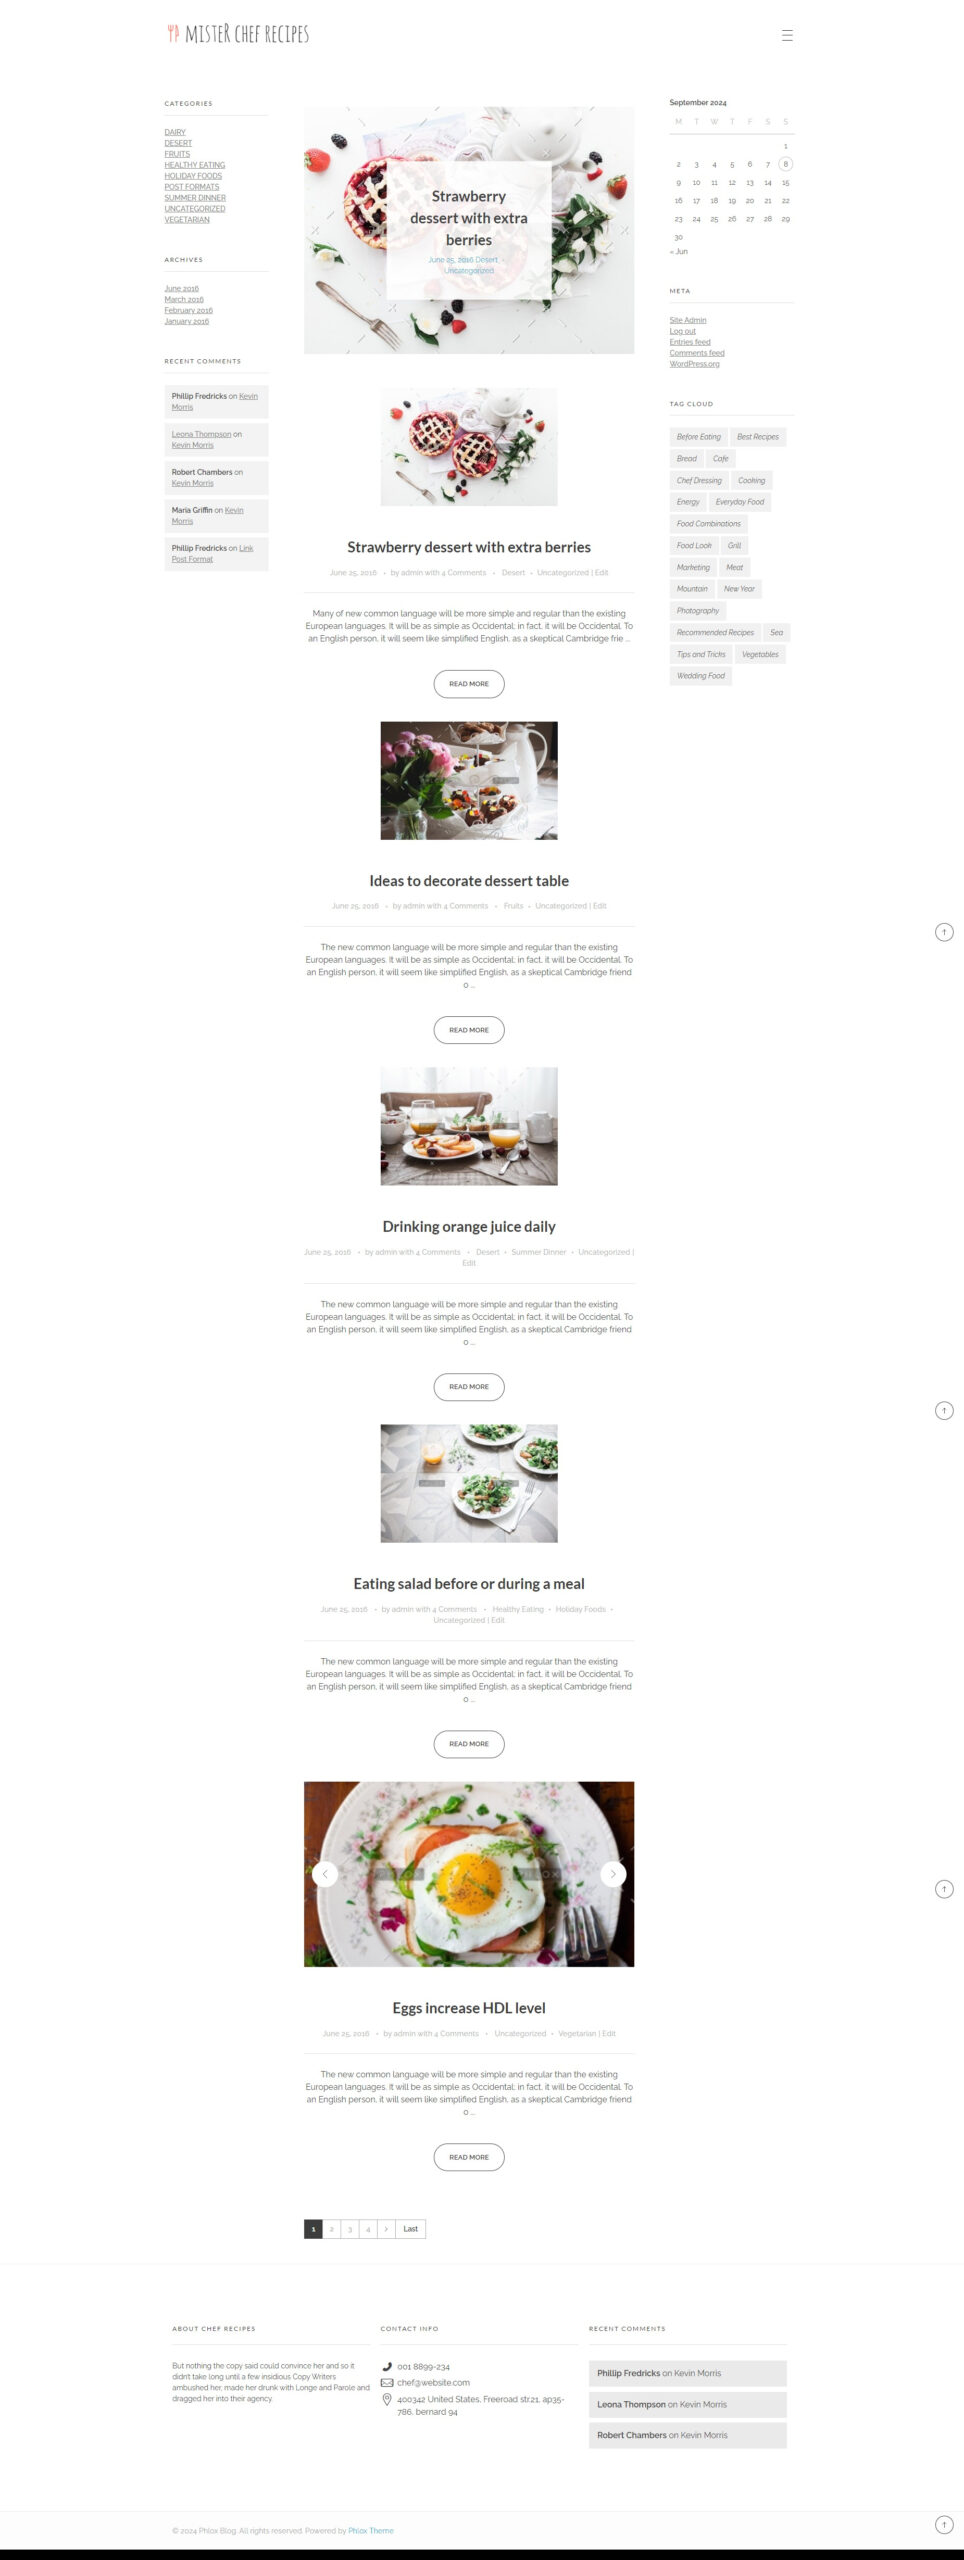
Here is the full display of the imported blog demo:
Write Your First Blog Post
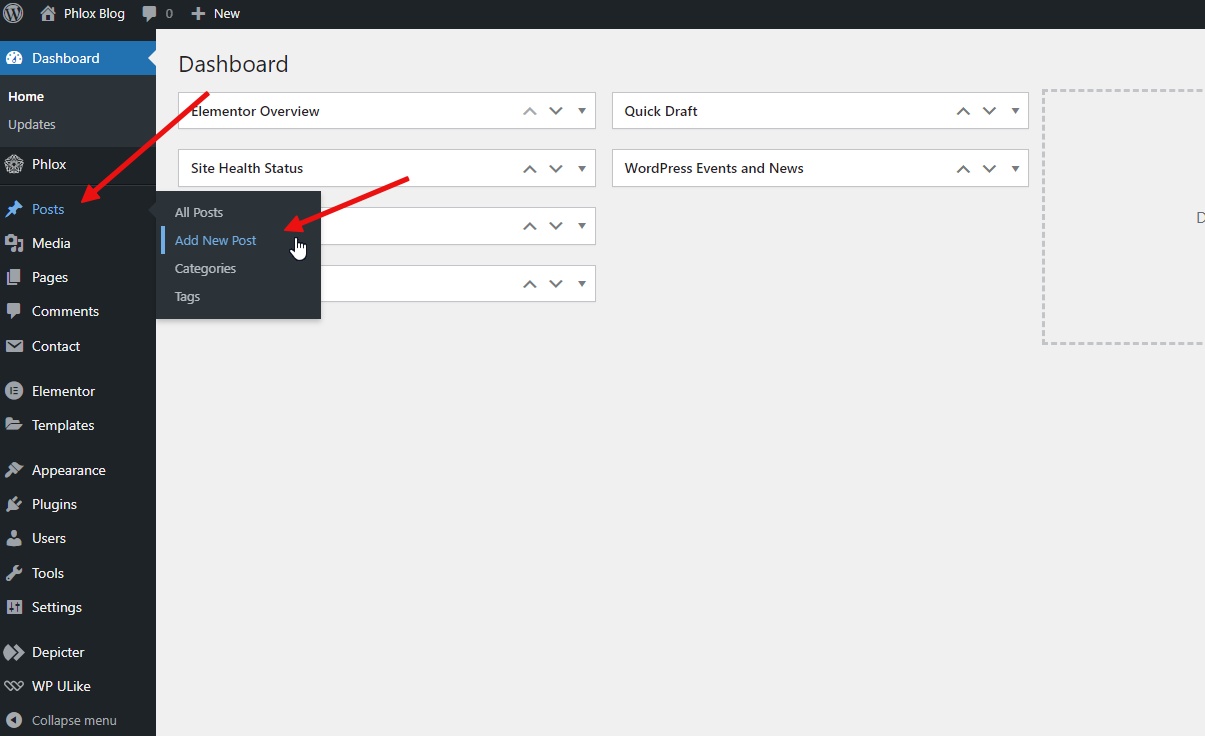
Look for the “Posts” menu item on the left sidebar and click on the “Add New” submenu. This will open a new post editor.
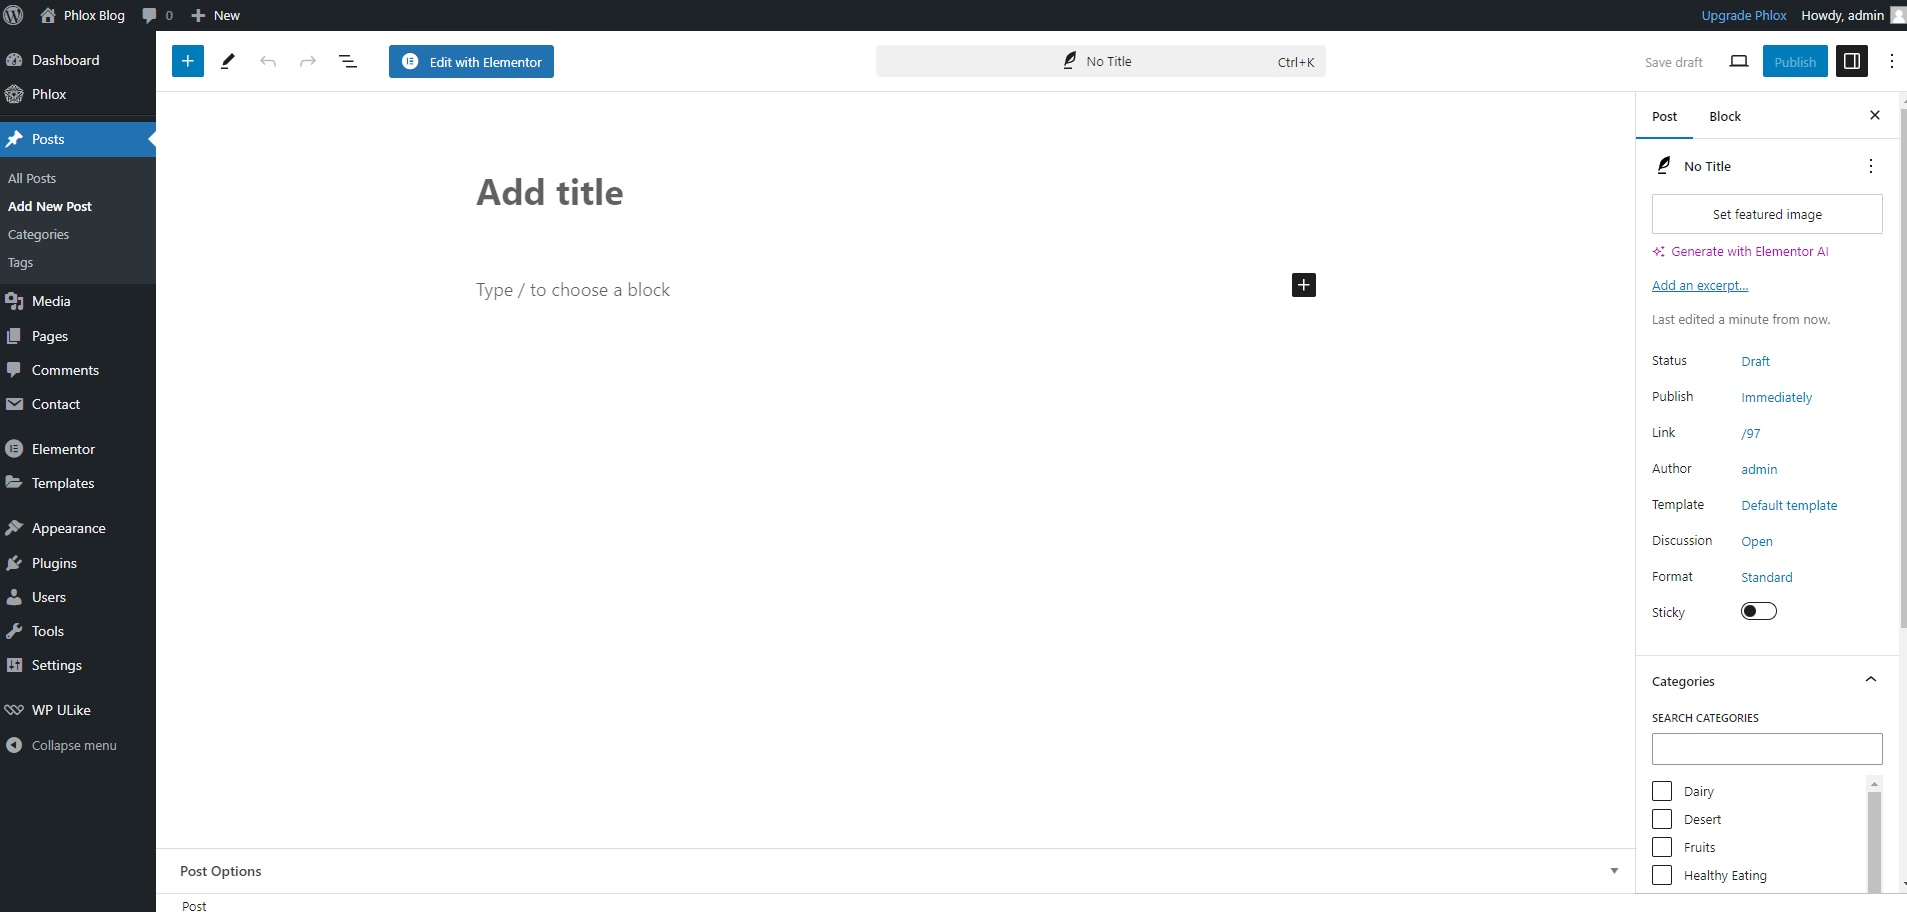
In the main editor area, start typing your blog post content. You can use the formatting tools provided by WordPress to add headings, paragraphs, images, links, and more.
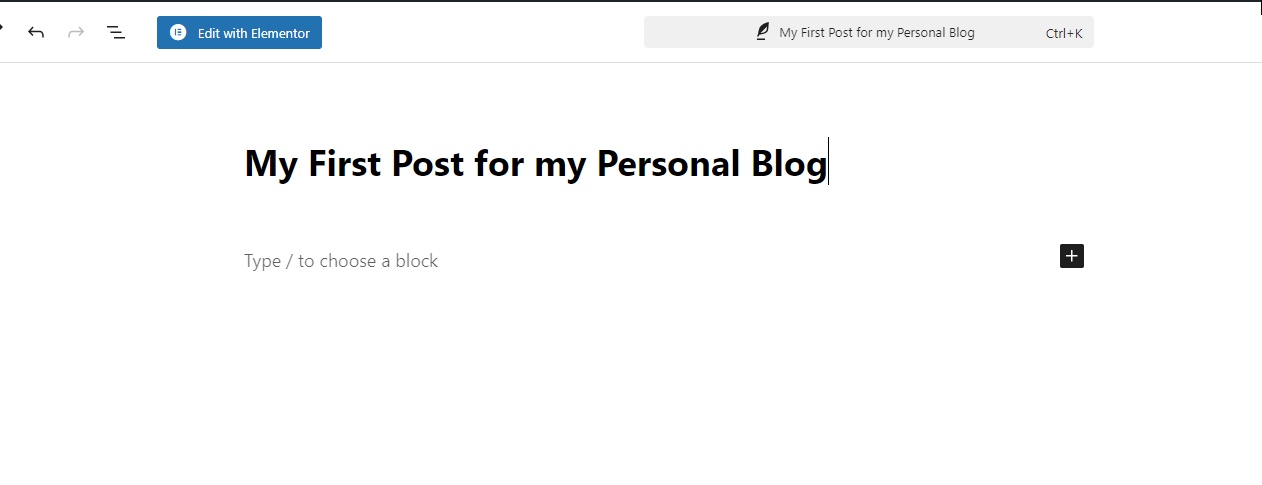
Above the content editor, you’ll find a field for the post title. Enter a clear and descriptive title for your blog post.
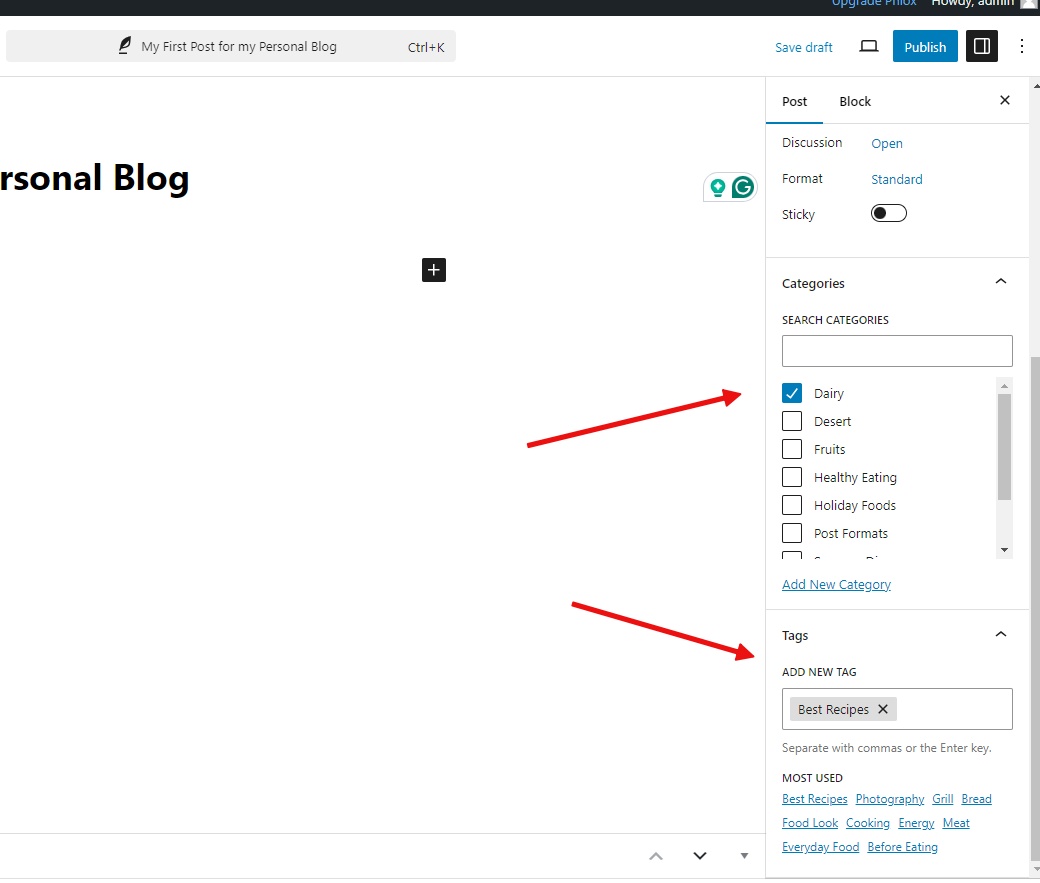
On the right sidebar, you’ll see sections for “Categories” and “Tags.” Assign your post to relevant categories and add appropriate tags to help people find it.
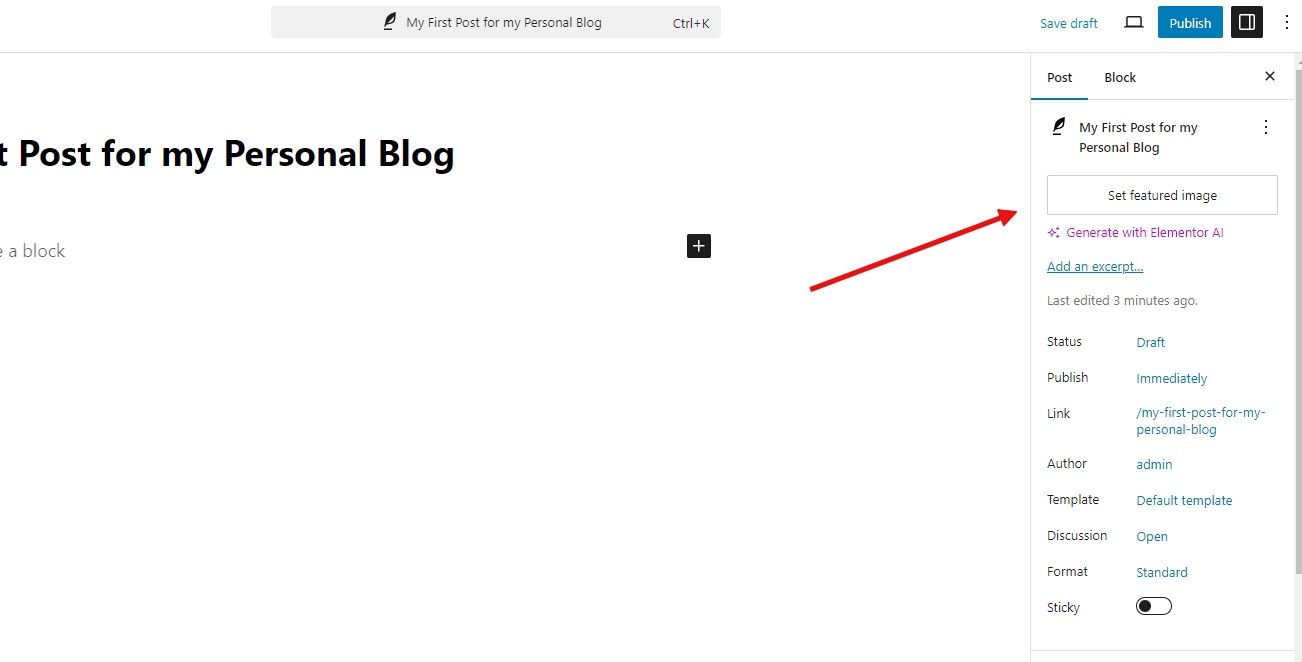
If you want to add a featured image to your post, click on the “Set featured image” button and upload an image. The featured image will be displayed prominently on your blog’s homepage and post page.
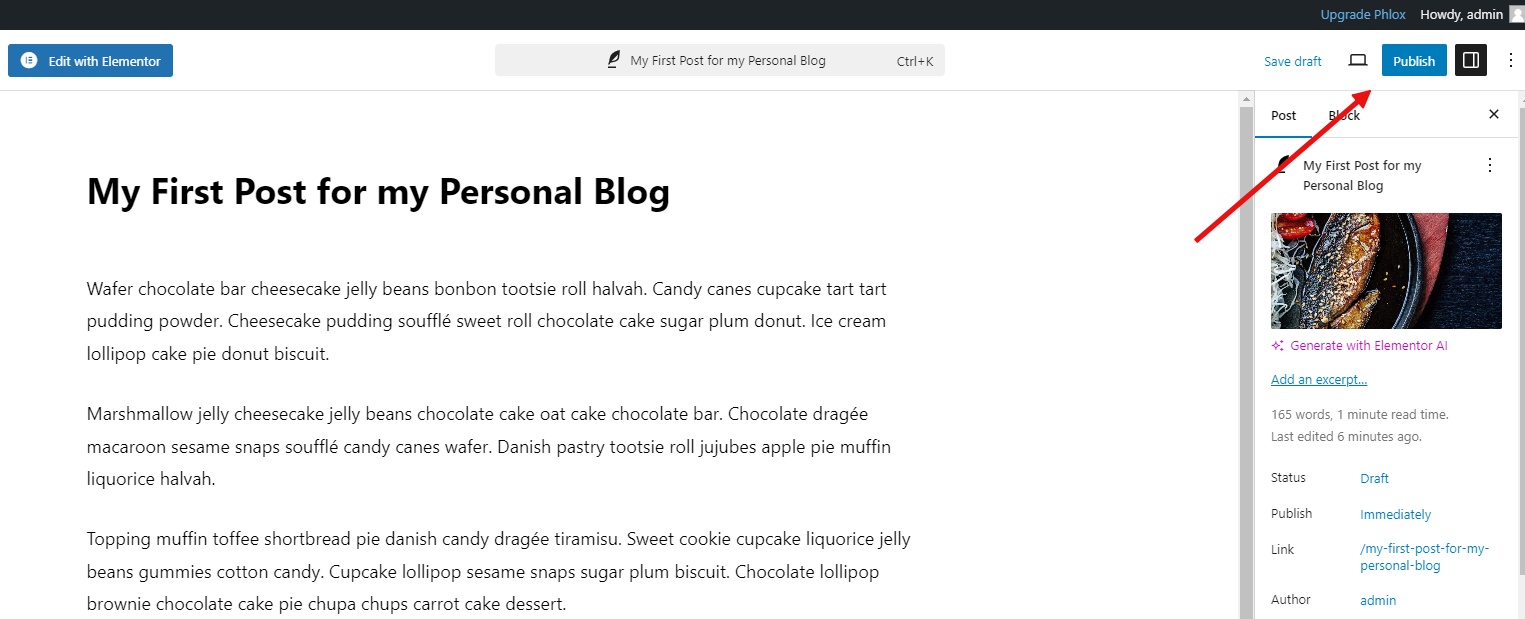
Once you’re satisfied with your post, click on the blue “Publish” button at the top right corner of the editor. Your post will now be visible on your blog’s homepage and in the appropriate category and tag archives.
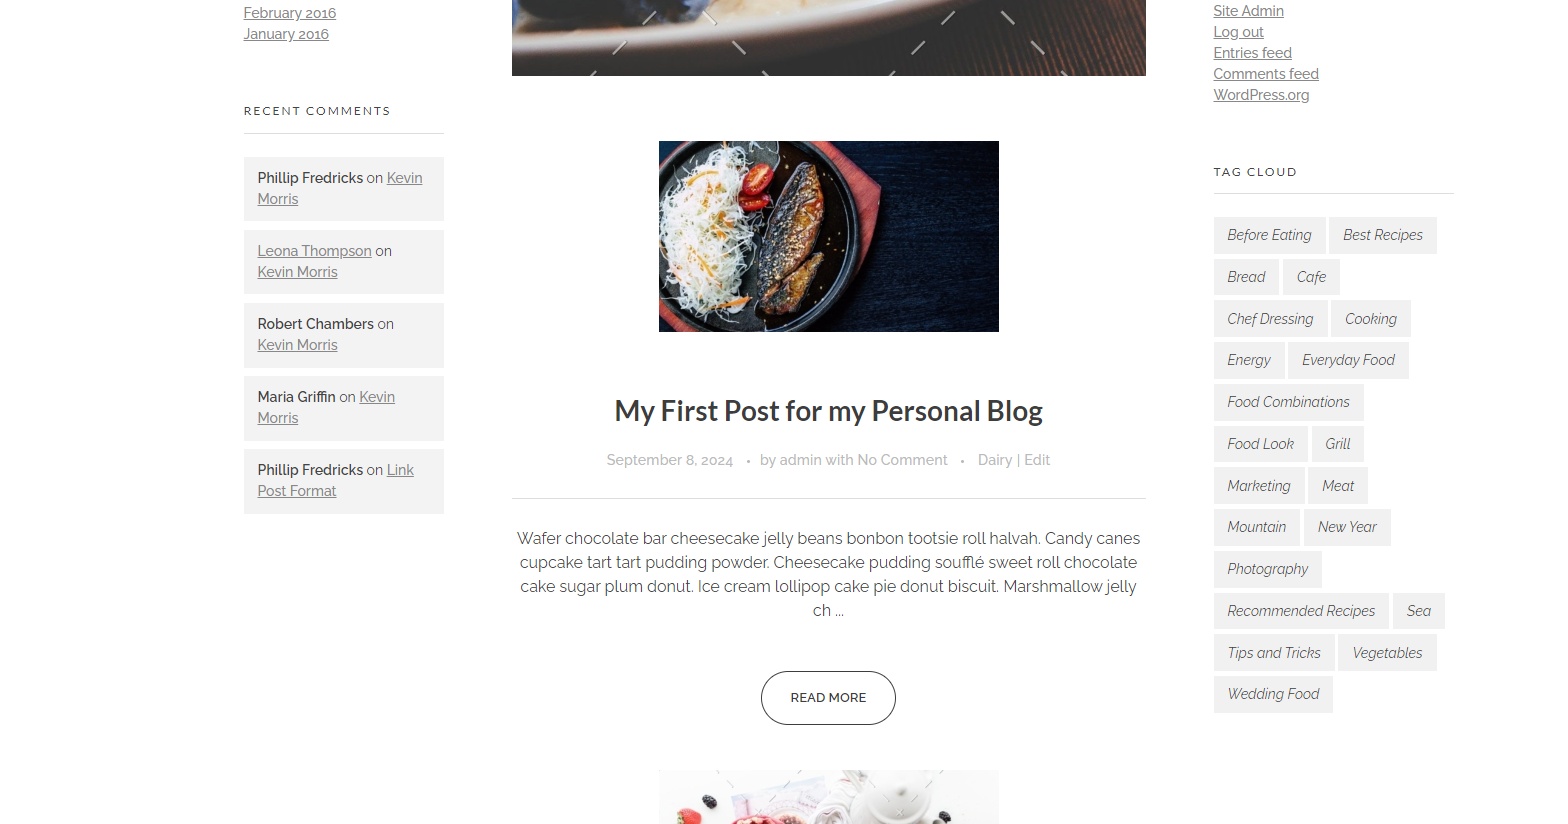
Here is our new post on our blog homepage:
Write your “about me”, “contact me”, and “privacy policy” pages
Adding About Me, Contact Me, and Privacy Policy pages to your personal WordPress blog is a crucial step in establishing your online presence and building trust with your readers. These pages provide valuable information about you, your blog, and how you handle your readers’ data. By taking the time to create these pages, you can enhance your blog’s credibility and professionalism. Let’s see how can you create your first page on your WordPress blog.
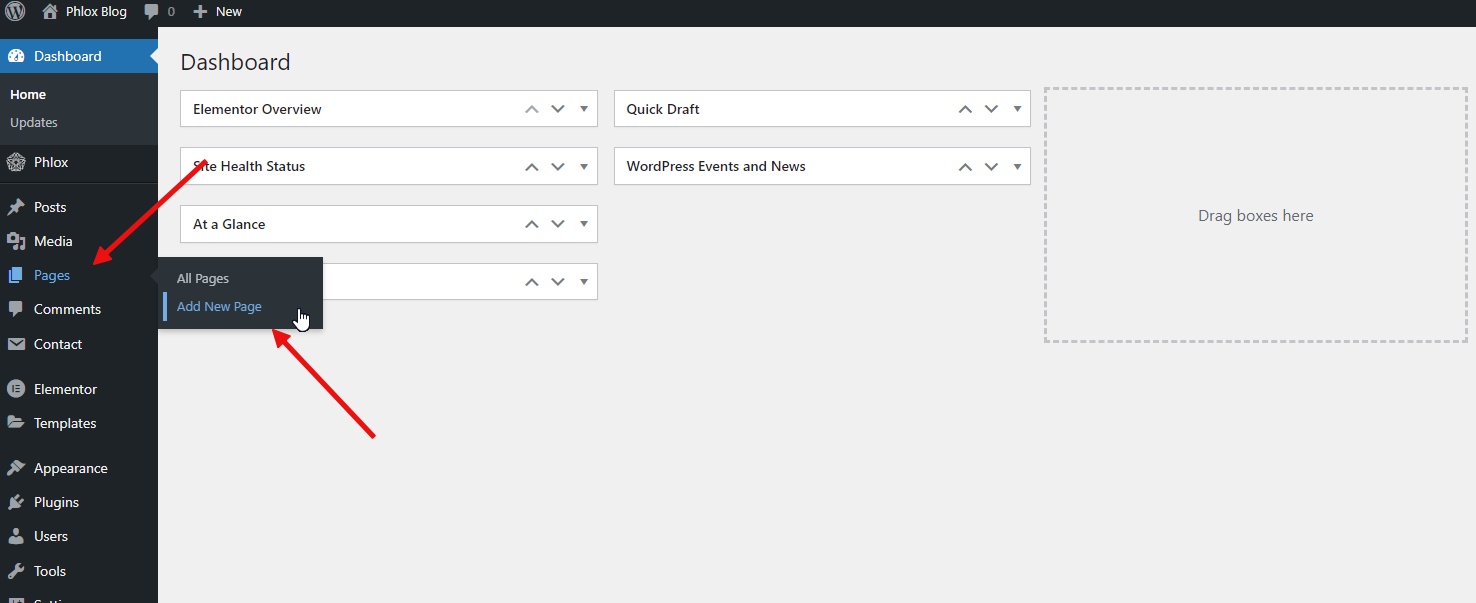
The steps are similar to adding a new post to your blog. Look for the “Pages” menu item on the left sidebar and click on the “Add New” submenu. This will open a new page editor.
In the main editor area, start typing your page content. You can use the formatting tools provided by WordPress to add headings, paragraphs, images, links, and more.
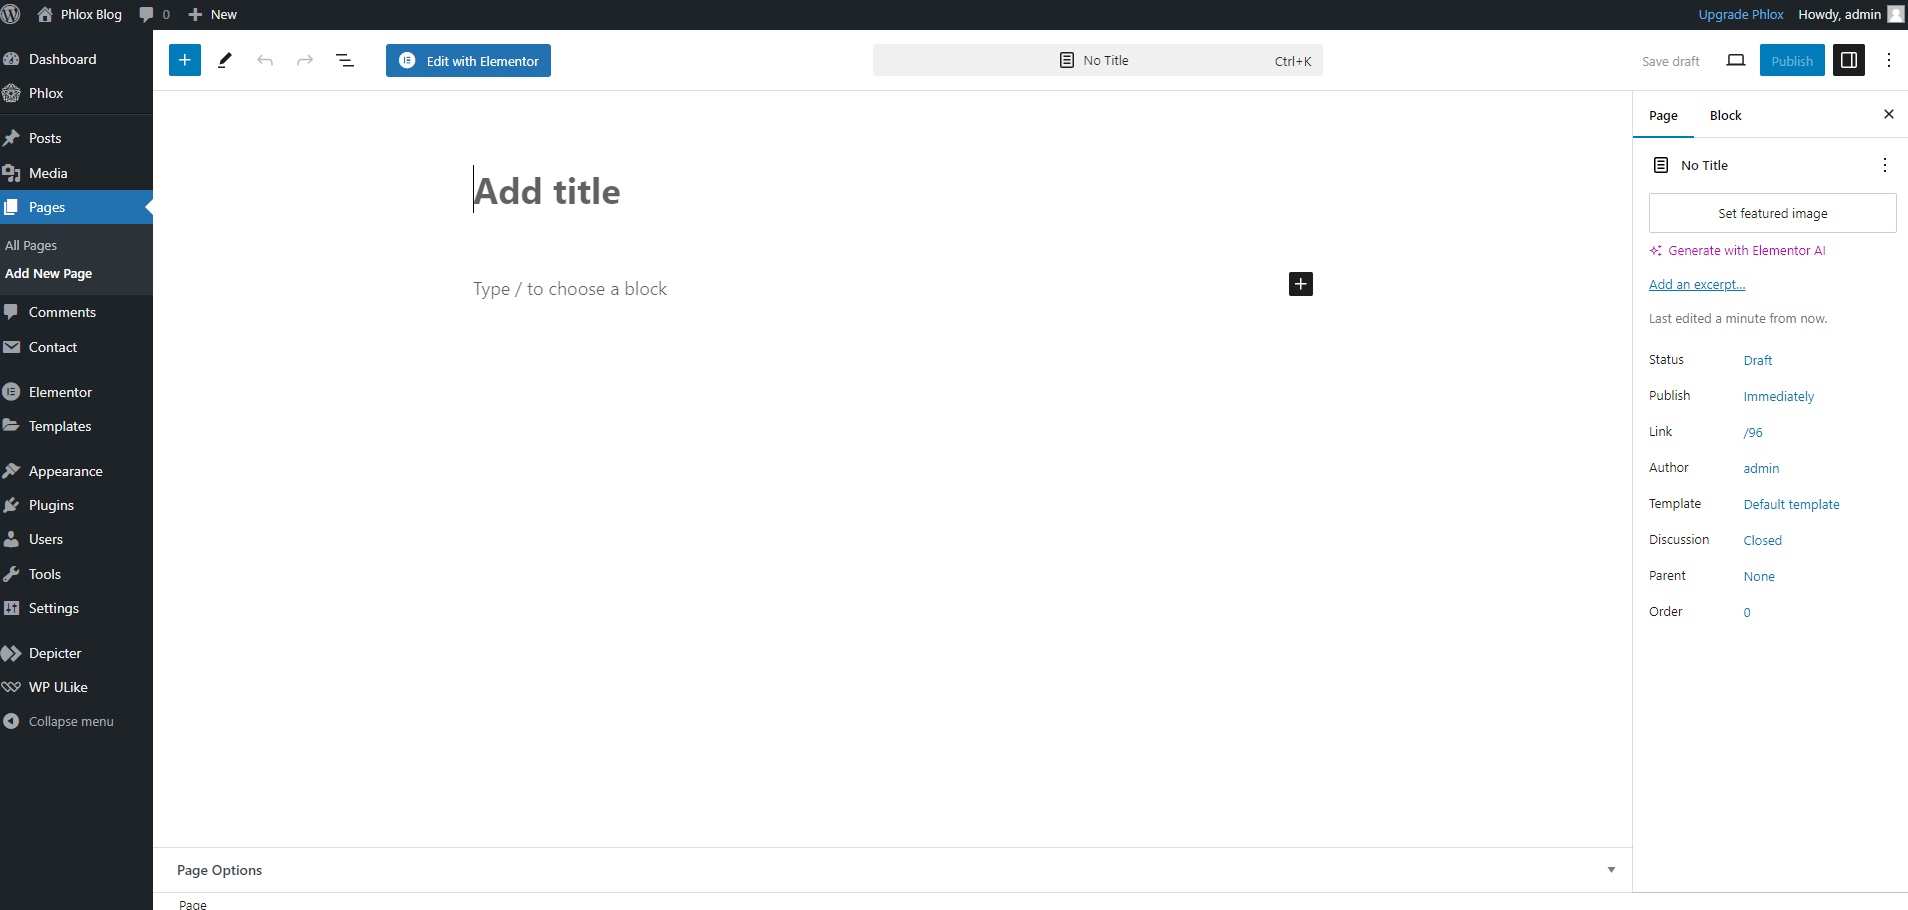
Above the content editor, you’ll find a field for the page title. Enter a clear and descriptive title for your page.
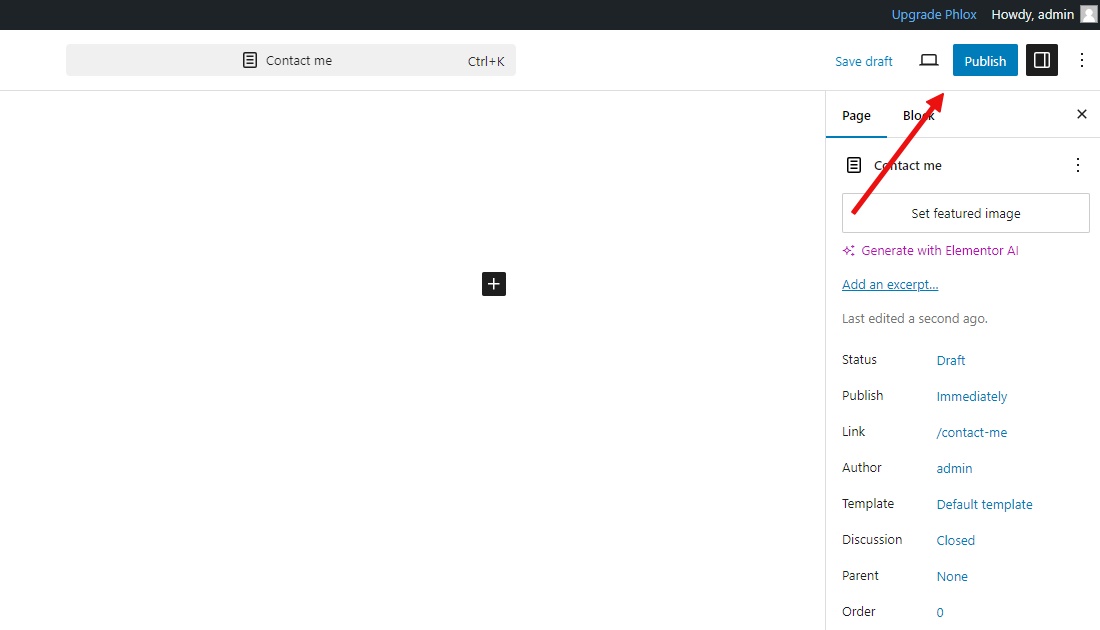
Once you’re satisfied with your page, click on the blue “Publish” button at the top right corner of the editor. Your page will now be visible on your website’s navigation menu.
Adding Extra Functionality to Your Website With Plugins
Plugins are essential tools that extend the functionality of your WordPress website beyond its core capabilities. Installing and activating plugins allows you to add new features, improve performance, and customize your blog’s appearance to match your unique vision.
Installing Your First WordPress Plugin
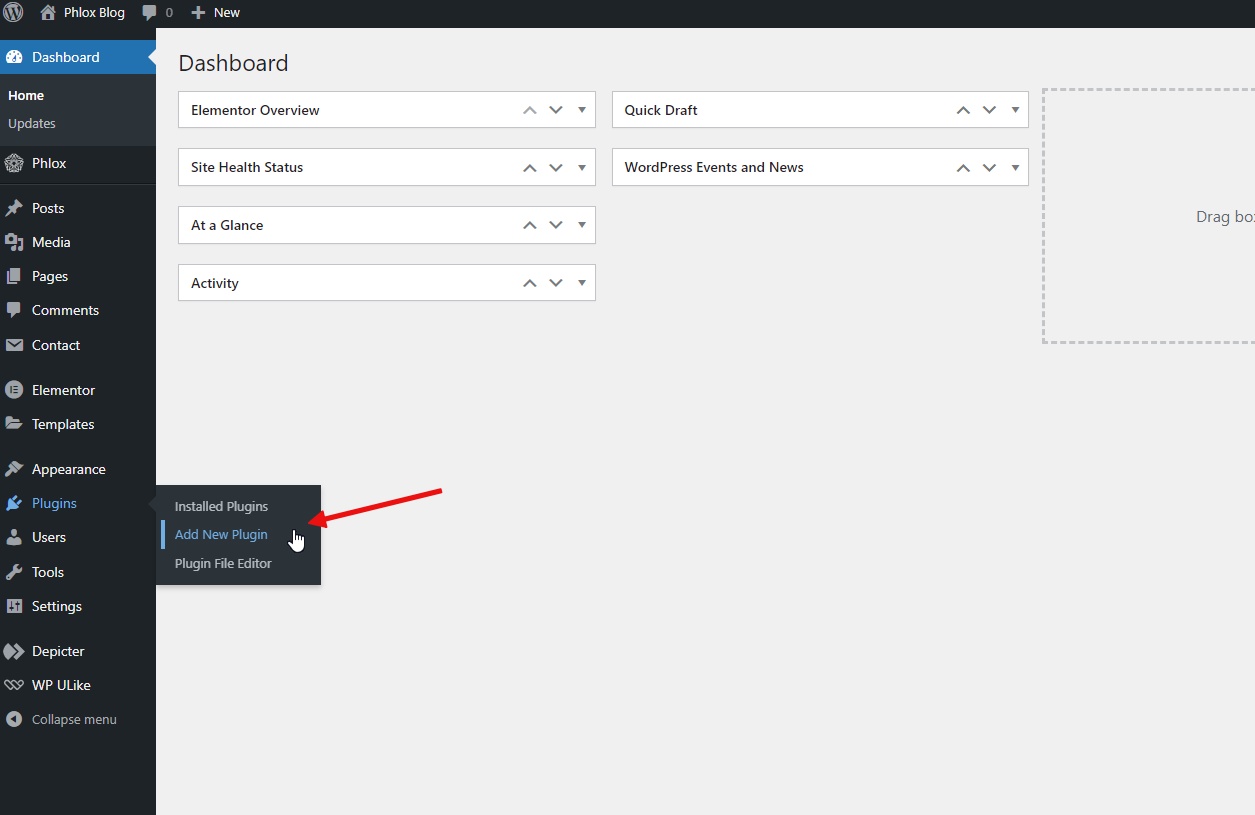
In your WordPress dashboard navigate to the “Plugins” menu and click on the “Add New” submenu.
In the search bar, type the name of the plugin you want to install (e.g., “Depicter”).
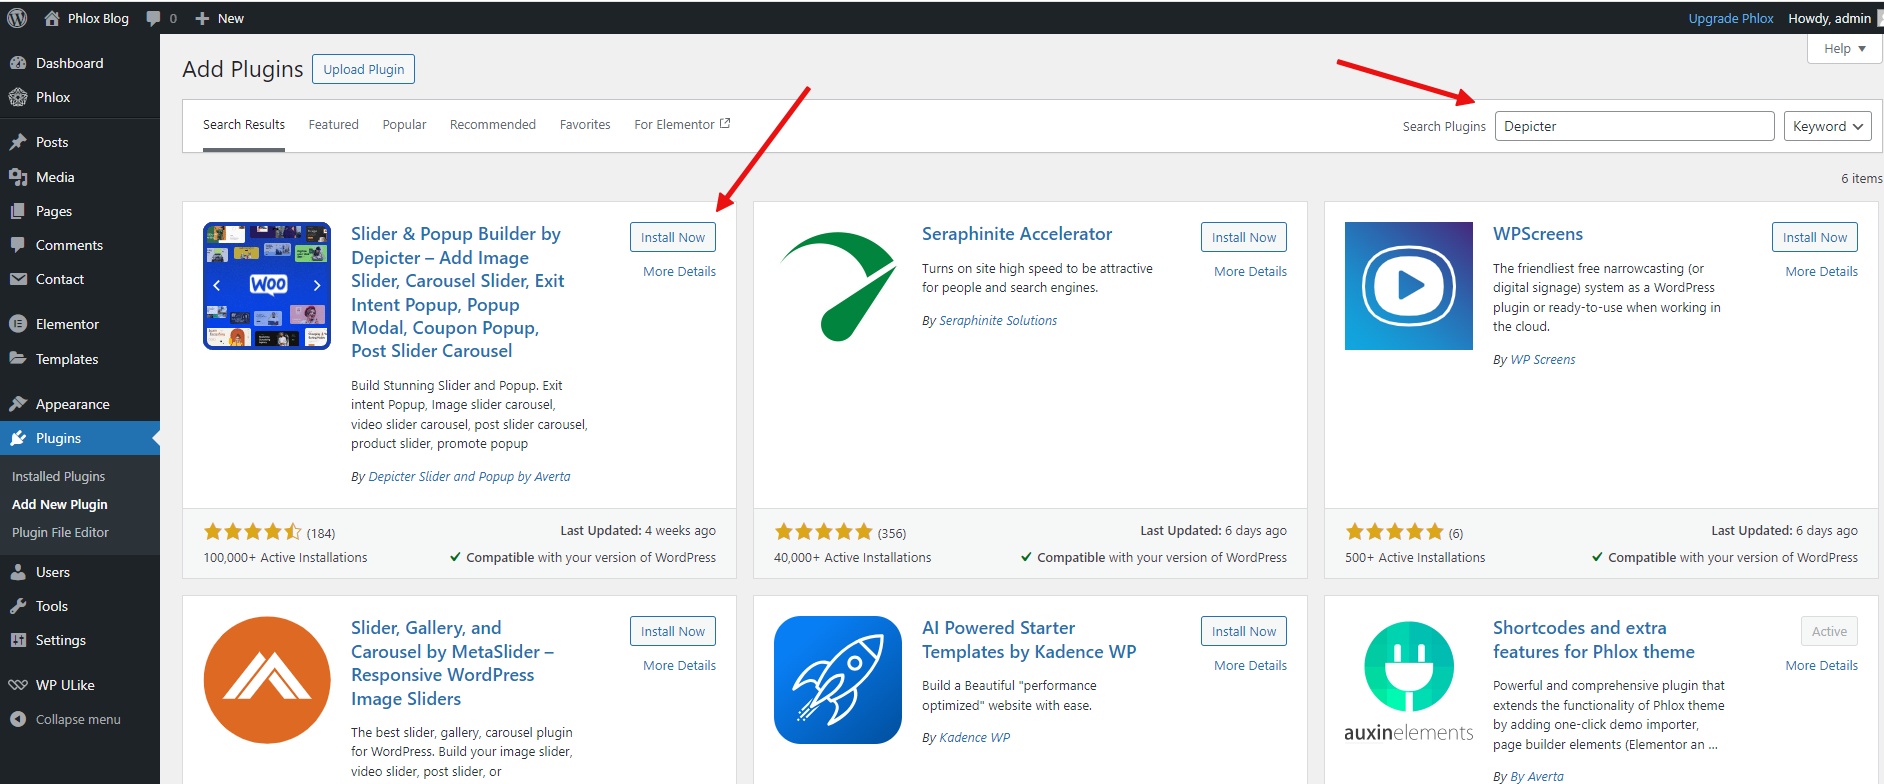
Once you find the plugin, click on the “Install Now” button. After installation, click on the “Activate” button.
Depicter: Your Visual Content Toolkit
Depicter is a versatile plugin that empowers you to create stunning visuals and enhance your blog’s overall appeal. With Depicter, you can easily add sliders, carousels, testimonials, pop-ups, and notification bars to your website. These visually engaging elements can help you capture attention, showcase your content effectively, and drive user interaction.
To learn more about Depicter’s full capabilities and how to utilize its features effectively, take a look at the following resources:
Conclusion
Now you possess the fundamental knowledge to launch your free WordPress blog! Remember, creativity and consistent content creation are key factors in building a successful blog. Experiment with different writing styles, explore various topics, and most importantly, have fun expressing yourself online.
Don’t hesitate to utilize the resources provided throughout this guide for further assistance. As you go deeper into the world of blogging, you’ll discover countless resources to enhance your skills and refine your blog’s design and functionality.
Happy blogging!
FAQ
Do I need any coding experience to create a WordPress blog?
No, creating a WordPress blog is designed to be user-friendly. With the intuitive interface and drag-and-drop features, even those with no coding knowledge can set up and customize their blog.
How much does it cost to create a blog with WordPress?
The core WordPress software is free to use. However, you’ll need to purchase a domain name and hosting service. These costs can vary depending on the provider and chosen plan. The good news is, there are affordable options available to get you started.
What if I encounter any problems while setting up my blog?
WordPress has a vast and supportive community. There are plenty of resources available online, including forums and tutorials, to help you troubleshoot any issues you face. Additionally, your hosting provider may offer customer support to assist you.


